Get Started with the Agent API
Bring the power of generative AI to your business with Agentforce. Build intelligent, trusted, and customizable AI agents and empower your users to get more done with Salesforce. Use the Agent API to communicate with AI agents directly from a REST API. Start sessions, send messages to the AI agent, receive messages, and end sessions using the API.
To access the Agent API, you must set up a connected app that supports the client credential flow. These instructions show you how to get your environment set up for use with the API and demonstrate how to make your first call to the API.

You must have Agentforce enabled with at least one agent activated. See Set Up Agents in Salesforce Help.
Agent API isn’t supported for agents of type “Agentforce (Default)”.
This video shows you how to set up your org to use the Agent API. It contains a simplified version of the steps below, along with guidance on using the Postman collection.

To use the Agent API, you must create a Connected App. We suggest you set up the app to support the client credentials flow, although you can use any flow that provides a JWT-based access token. Use the connected app to create a token. To learn more about connected apps, see Create a Connected App in Salesforce Help along with these specific topics.
- Configure a Connected App to Issue JWT-Based Access Tokens
- Configure a Connected App for the Client Credentials Flow
These instructions are for a sample connected app implementation that supports Agent API communication.
Starting with Summer ’25, you can no longer create connected apps from App Manager in Setup. To create a connected app, go to Settings under External Client Apps in Setup. Agent API doesn't currently support external client apps (ECAs)—it only supports connected apps.
- Open your org and go to Setup.
- From Setup, select Settings under Apps > External Client Apps.
- Turn on Allow creation of connected apps.
- Click the New Connected App button.
- For Connected App Name, specify an app name.
- For Contact Email, specify your admin email address.
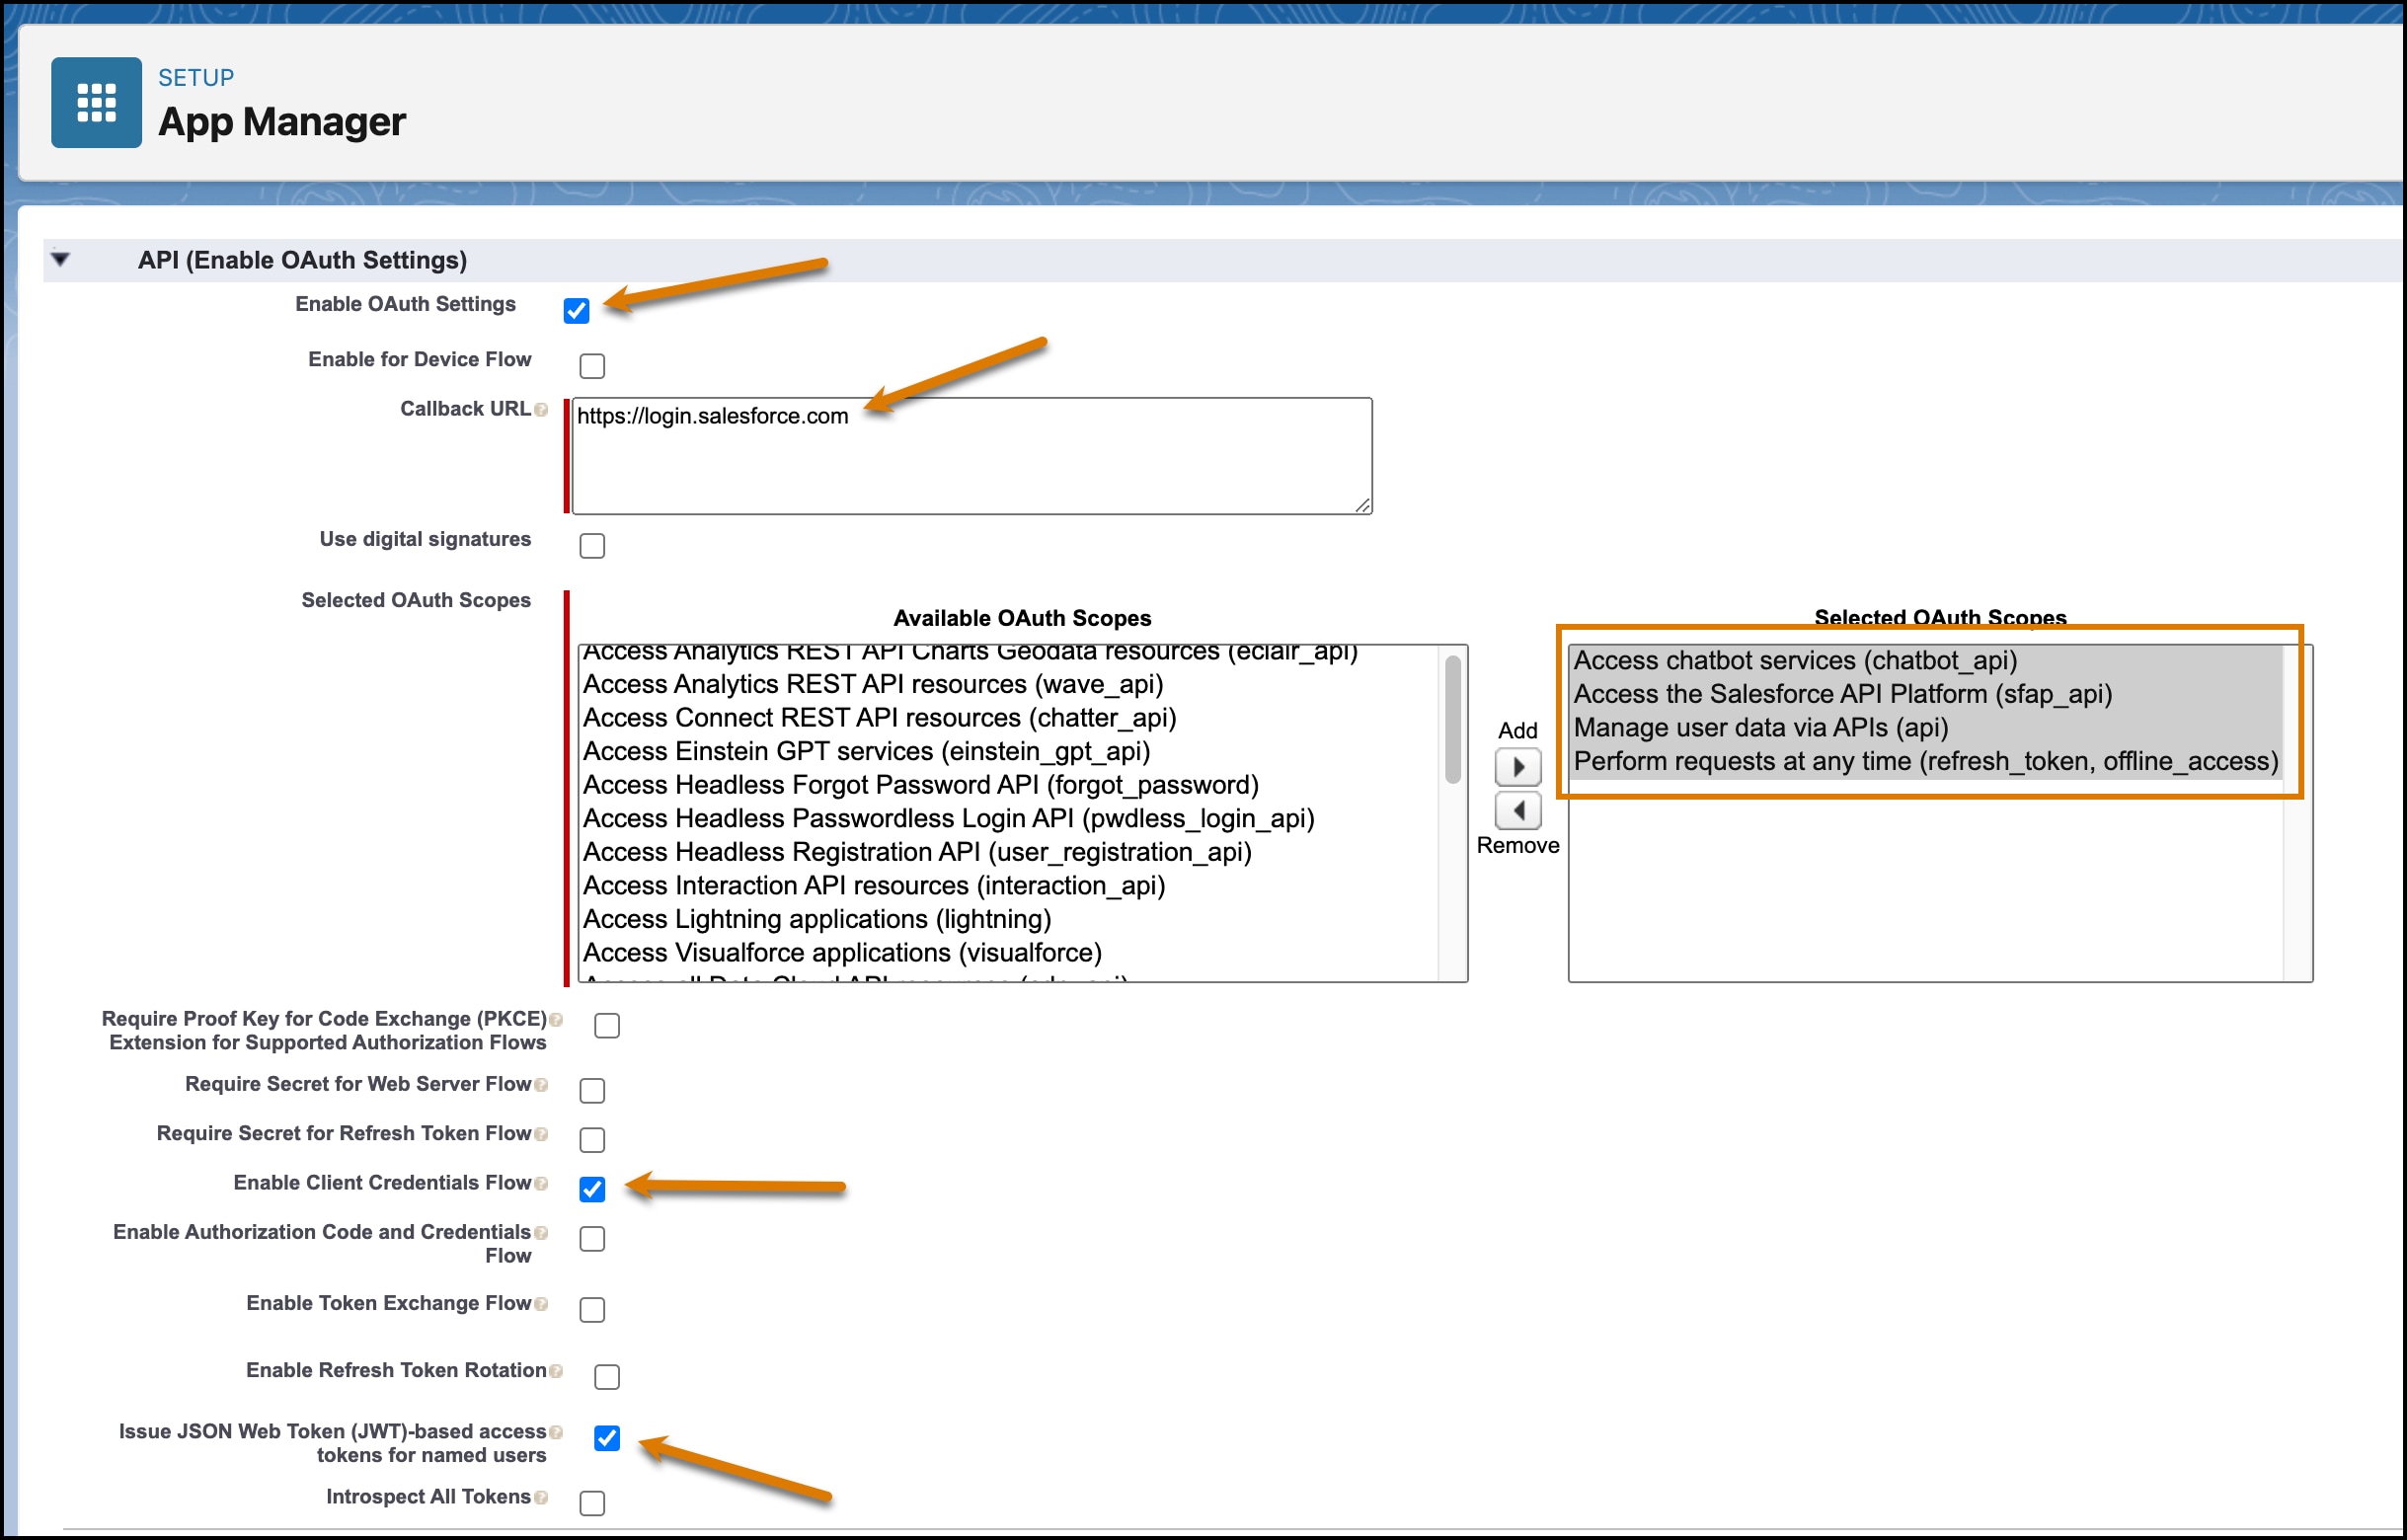
- In the API section, check Enable OAuth Settings. This action displays additional OAuth-related settings.
- For Callback URL, specify
https://login.salesforce.com. - From Selected OAuth Scopes, add these scopes to the connected app.
- Access chatbot services (chatbot_api)
- Access the Salesforce API Platform (sfap_api)
- Manage user data via APIs (api)
- Perform requests at any time (refresh_token, offline_access)
- Deselect:
- Require Proof Key for Code Exchange (PKCE) Extension for Support Authorization Flows
- Require Secret for Web Server Flow
- Require Secret for Refresh Token Flow
- Select:
- Enable Client Credentials Flow
- Issue JSON Web Token (JWT)-based access tokens for named users
- Review this screenshot to verify that you selected the correct settings.
- From the bottom of the page, save the app, and then click Continue.
- After saving the app, you see the Manage Connected Apps page. Click Manage. (To view this same screen later, select Manage Connected Apps from Setup.)
- Click Edit Policies.
- In the OAuth Policies section, from the Permitted Users dropdown, select the appropriate permitted users. See Manage OAuth Access Policies for a Connected App in Salesforce Help.
- In the Client Credentials Flow section, set Run As to a user that has at least API Only access.
- From the JWT-Based Access Token Settings for Named Users section, keep Issue JSON Web Token (JWT)-based access tokens checked and leave the Token Timeout value at 30 minutes.
- Save the app.
- This step is only applicable if you selected "Admin approved users are pre-authorized" from the OAuth Policies section above. Scroll down the page to the Profiles section, click Manage Profiles, and select the profiles needed to access this connected app. See Manage Other Access Settings for a Connected App in Salesforce Help.
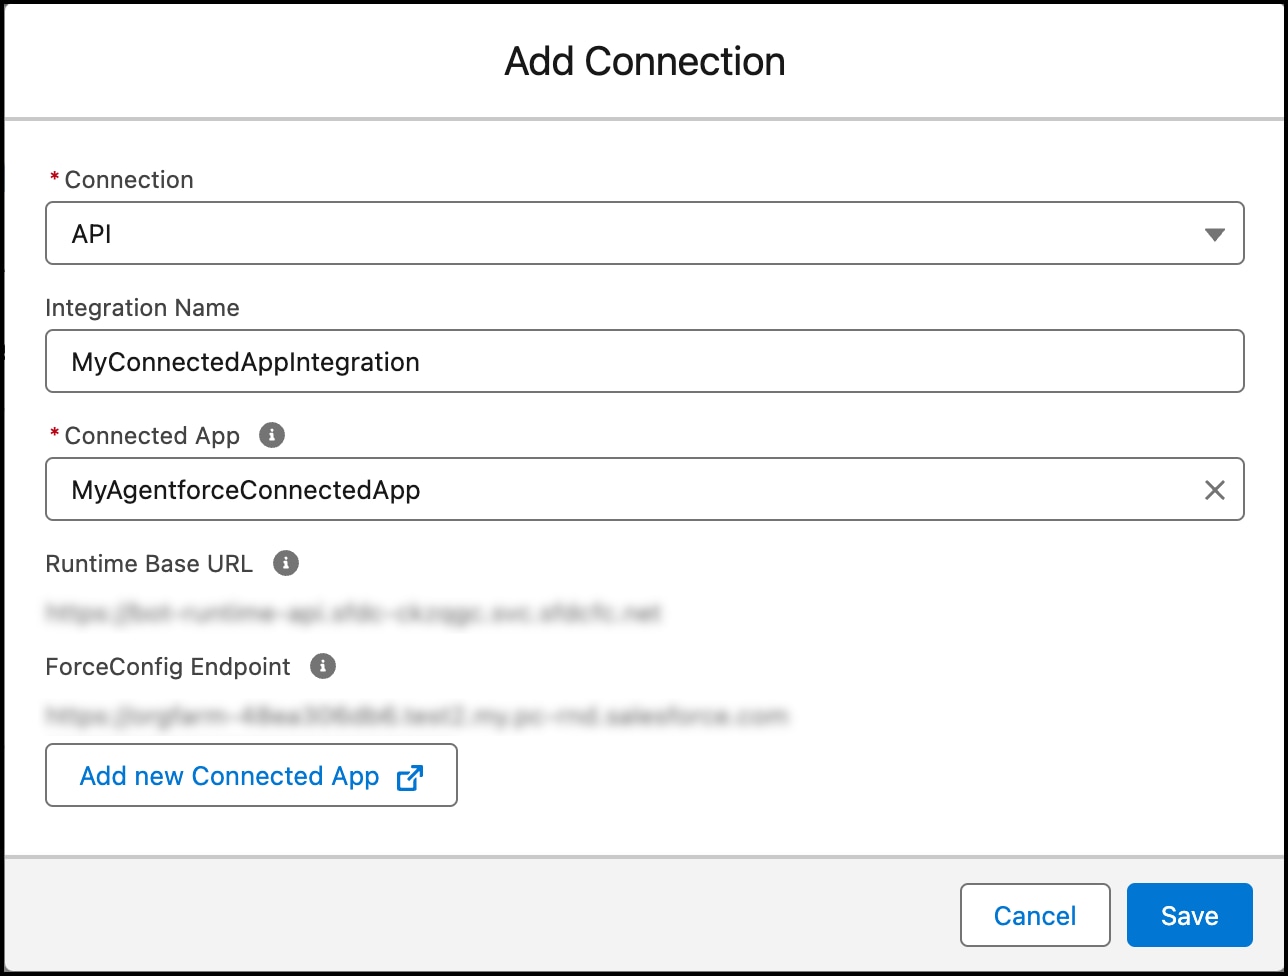
Before calling the API, add your connected app to your agent.
- From Setup, select Agentforce Agents. Select your agent.
- Select the Connections tab, and click Add from the Connections section.
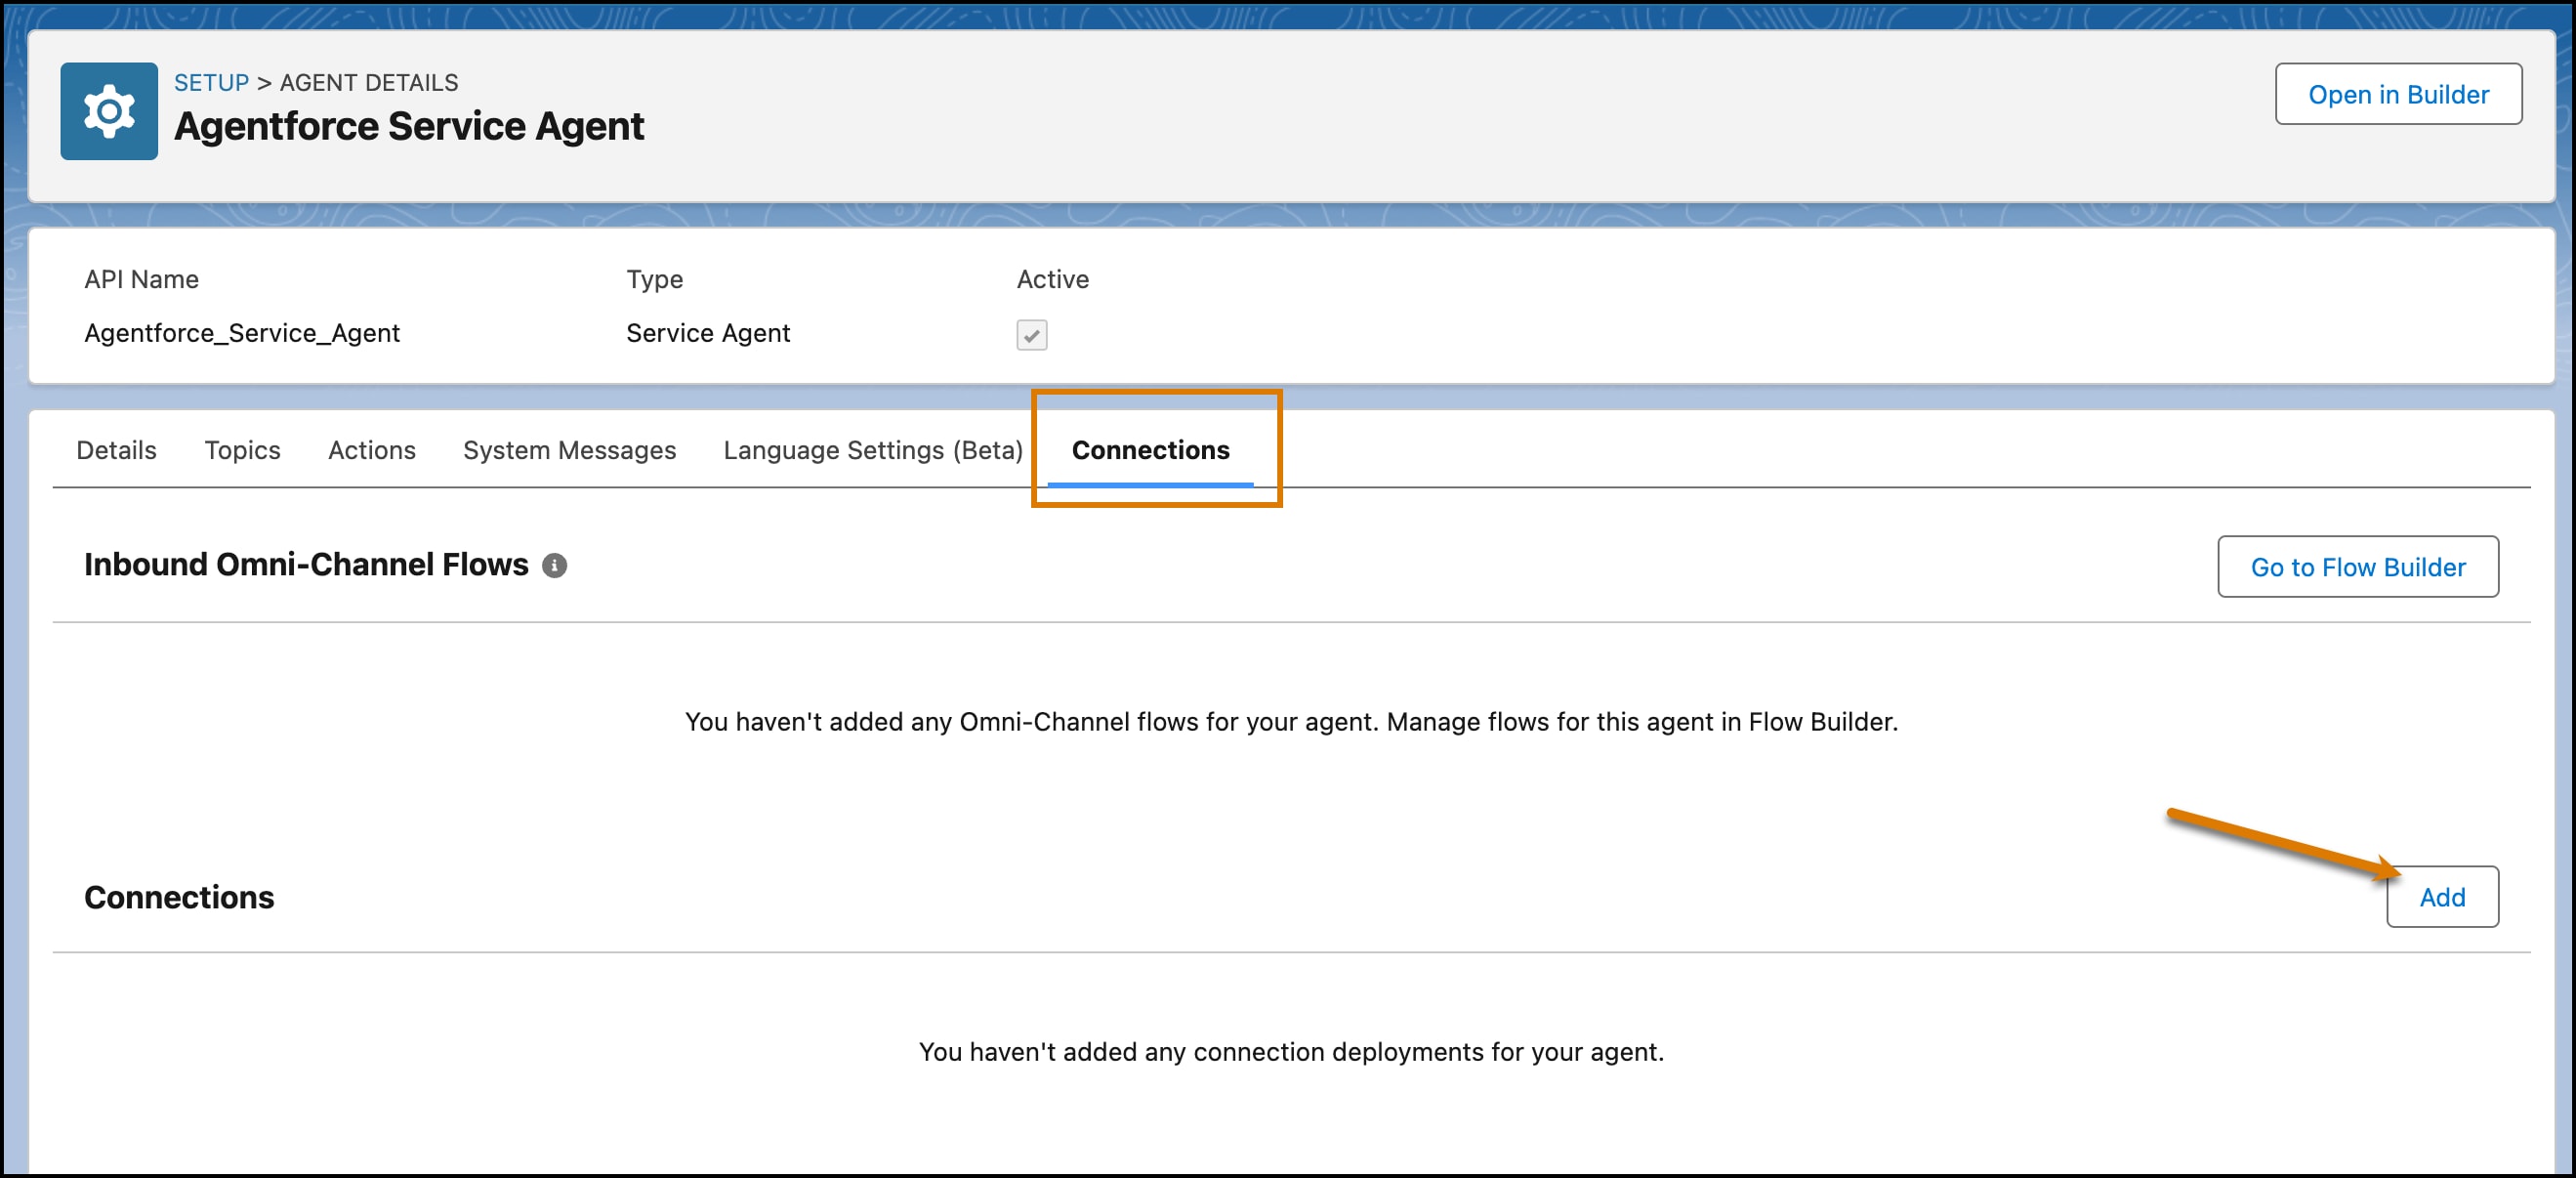
- Add a new API connection, choose your connected app, and then save.
To create a token, you need the consumer key and consumer secret from your connected app.
- From Setup, select App Manager.
- Find your connected app, click the dropdown arrow on the right, and then click View.
- Click Manage Consumer Details.
- Copy Consumer Key and Consumer Secret.
All calls to the Agent API require a token. Create a token by using the consumer key, consumer secret, and your domain name.
MY_DOMAIN_URL: You can get the domain from Setup. Search for My Domain. Copy the value shown in the Current My Domain URL field.CONSUMER_KEY,CONSUMER_SECRET: You can get the consumer key and secret by following the instructions in Obtain Credentials.
The previous command returns a JSON payload similar to this response.
Copy the access token specified in the access_token property. This token is required when making requests to the API.
After you set up your connected app and created a token, you’re ready to call the API. Before making the call, gather this information.
AGENT_ID: The ID of the agent that you want to interact with. You can find this ID in the URL of the Agent Overview Page. When you select the agent from Setup, use the 18-character ID at the end of the URL. For example, when viewing this URL,https://mydomain.test1.my.pc-rnd.salesforce-setup.com/lightning/setup/EinsteinCopilot/0XxSB000000IPCr0AO/edit, the agent ID is0XxSB000000IPCr0AO.ACCESS_TOKEN: The token that you created in Create a Token.RANDOM_UUID: A random UUID value that you provide to represent the session key. You can use this parameter to trace the conversation in your agent’s event logs.MY_DOMAIN_URL: From Setup, search for My Domain. Copy the value shown in the Current My Domain URL field.
This curl command creates a new agent session with the Agent API.
The bypassUser parameter indicates whether to use the agent-assigned user instead of the logged in user. If set to true, the API uses the user associated with the agent. If set to false, the API uses the user associated with the token. For this client credentials flow scenario, we set the value to true. However, you may need to change this value depending on your use case.
When this call succeeds, you receive a response with a session ID and additional info.
Congratulations, you’ve successfully started using the Agent API! To continue using the API, see Agent API Examples and the Agent API Postman Collection.